 The purpose and necessity of repotting bonsai is axiomatic, and need not be repeated here. However, there is some confusion about the best way to accomplish this crucial task. In this article, we will examine in depth every aspect of the repotting of an established, older fukien tea bonsai, paying special attention to the proper use of materials and tools to give the best result for both horticultural practice and aesthetics. While this is an established, older bonsai, these procedures will improve the repotting outcome of any bonsai on which they are used.
Materials Needed
It seems silly and simplistic to say it, but the first thing needed for repotting is a tree. The only reason to mention this is to point out that the tree should be strong and healthy to repot in this manner. If your tree is very weak, repotting can kill it, so be careful! Very few “emergency repottings” really are. Better to nurse the tree to better health first.
You will need an appropriate pot for your tree. In this case, we are placing the tree back into its original pot, so there is no question about the correct one. The following example of three different pots for one tree will show a few of the considerations in choosing a pot. The size, shape and color of the pot should complement the tree’s style and species. Often, real world considerations slip in and we end up placing the tree in any pot that will fit! While this is not the best solution, it is preferable to forcing a tree into a pot that is too small. Be sure you have your pot selections ready before you begin. 
Figure 2. All three pots in this case are unglazed stoneware, the pot of choice for most conifers. This is quite a large tree, so these pots are sizeable. This pot’s color provided an excellent contrast with the bark and foliage. However, it was rejected for being too deep, as well as not “masculine” enough for such a rugged tree.

Figure 3. This pot had a bit better depth, but the style once again was a bit too soft, and the color blended far too much with the trunk.
 Figure 4. This seemed the best fit, since it was simple, elegant, and the red color really complemented the bark and foliage. The nebari barely fit into this pot. The pot is oval, and the roots were touching both front and back of the pot. Be sure you have plenty of wire on hand. 2.5mm aluminum is common and easily handled for all but the largest trees. This will be used to hold the screen in place to cover the drain holes, and to tie the tree securely into the pot. Smaller aluminum wire is really too soft to be secure except for the smallest of trees. For very large trees, especially conifers, annealed copper wire can be used to tie the tree into its pot.
 There has been some controversy in recent years about the necessity of tying the tree into the pot. Rest assured that NOT wiring the tree into the pot is a very recent innovation. If you repot without securing the tree well, the very nature of the bonsai soil will allow the tree to move or even fall out of the pot from the slightest wind or movement. Anyone with squirrel problems, or cats, or a real back yard can attest to the problems with a poorly secured tree. Even if the tree does not come out of the pot, trees thrive better when secured, since the roots do not have to overcome constant movement. Another controversy has come about over the materials used to tie trees in. Some have called for the use of cotton twine. This is in response to trees badly wired into their pots, damaged because of the neglect. It is far better to learn the proper way to do things than to find a stopgap so one doesn’t have to learn the proper way.
Soil screen is another important component. Much has been said about soil screen, from disregarding it, to insisting that it be imported Japanese screen specifically for bonsai. The job of the soil screen is to prevent soil from leaking out of the pot, producing root-killing empty space at the bottom of your bonsai pot. There are a number of products that will accomplish this purpose. One of the major suppliers of bonsai tools has a rubberized cloth mesh for sale. We do not recommend this, as it will not hold its shape under the weight of bonsai soil. One highly recommended product is called “plastic canvas” and is available for about three 8”X11” sheets for a dollar. It is commonly used to wrap with yarn to make craft projects, and one sheet will suffice for a dozen repottings. Some recommend painters’ webbed adhesive joint compound tape. If the pot is completely clean and dry, I don’t know why this would not work. I have never used it and do not know how well it will hold up in repotting. Some recommend skipping this item completely for holes less than ½ inch in diameter. This seems large to us, since our soil mix is generally 3/8 inch or smaller.
A soil sieve will be important for making certain your soil drains well, as well as for shredding your sphagnum moss to settle on top of the soil. Speaking of soil, be certain you have plenty on hand. Very little is more frustrating than finding in the middle of repotting that you lack about a gallon of soil!
Have a component for a drainage layer, slightly larger than your bonsai soil. At the risk of slings and arrows, “perched” water tables happen in nature, not in bonsai pots! And, since you brought it up, have plenty of water available for watering your newly repotted tree.
Finally New Zealand sphagnum moss (white), when shredded through the large screen of your soil sieve, makes an attractive and effective method of retaining moisture in your pot.
Tools Required

In addition to wire cutters and pliers, root shears, root cutters, and chopsticks (all standard equipment of typical repotting), you should have at the ready a few more items. A serrated sickle drawn along the edge of the soil will help remove the tree from the pot. Angled tweezers are far more useful in arranging fine roots at the top and edges than chopsticks. Chopsticks are useful, however, when it is time to incorporate new soil around your freshly repotted tree. A root rake, properly used, exposes lower roots for cutting. Soil scoops for fine placement of soil (not shown), a bonsai broom to smooth it, and a trowel to tamp the soil all are important for the aesthetic effect of a beautifully repotted bonsai. It is impossible to place too much emphasis on the value of a turntable when doing this work.
Handling the Established Bonsai
Proper handling of an older bonsai is critical to its continued health and beauty. On a rough-barked species, care should be taken never to touch the bark on the trunk or major branches where it can be damaged. Some trees, such as azaleas, have very delicate smooth bark and must also be protected. There are a variety of techniques available which can help prevent problems. The fukien tea does not require as much care in handling.
One of the best ways to avoid difficulties like this is to have a competent and patient assistant. Proper respect for an elder tree demands that it be treated with the utmost care. Delicate ramification should be protected in the most careful way. Since you will have wired the tree prior to repotting (if the tree was to be wired), be watchful of displacing wired branches. Avoid having to handle wired branches again.
To avoid touching the delicate bits of the tree, several techniques can be used. When lifting a tree from its pot, the lifting can be done from under the “armpit” of the branches. This will minimize damage done to the tree. Simply freeing the soil from the pot and pushing up at the joint of branch and trunk can be effective in removing the tree. Chopsticks can come in very handy here too, especially on heavier trees. Drive the chopsticks deeply into the root mass and use them as leverage points to lift the tree.
Preparation
To prepare the tree for repotting, it must of course have been cared for well throughout the year. Proper watering, oversight, protection from the harsher elements if needed, and fertilization will give your tree the strength it needs to thrive in the coming years after repotting.
In the case of moving the tree to a new pot, you should prepare the pot beforehand to receive the tree. Be sure that it is clean, without damage, and large enough for your tree. Since we are putting the tree back into its same pot, these steps will be shown after removing the tree, but before doing any root work.
We have the tree ready, and the pot ready, all our supplies are available and tools clean and prepared. Now, do not forget to prepare the artist. This work should not be rushed—do not attempt this when you are pushed for time. Find the right place for the work. Bright sun, low humidity, and hot, dry, winds are a recipe for disaster, so a shady spot such as a garage or shaded deck are ideal. This will help you avoid worrying about your roots drying out. Be sure, if you have friends over to help and advise or learn, that you have plenty of your favorite beverage in a cooler at your side. Just be sure you do more of the beveraging after the work than before!
Remove the Tree from Its Pot
 With your assistant holding the tree securely, remove all the wires at the bottom of the pot using your wire cutters. Cut the wire as closely inside the openings as possible (Figure 6), so that nothing is dragging on the roots as the tree comes out of the pot. Cut the tips that hold the screen in place, too, since your roots will probably be entangled in them somewhat.
Using your sickle (Figure 7), and holding the pot securely from the other side, make quick, shallow strokes until you get to the bottom of the pot. Be sure you keep your free hand away from the cutting edge! The serrated blades on these sickles are very dangerous. Trying to saw down to the bottom of the pot will be difficult and damage more roots, while shallow strokes will make the job easier and cleaner. Do this on three sides only! It’s best to leave one side unmolested, so that when we turn the tree on its side, the root mass will have a secure base to rest on.
Prepare the New Pot
Now it’s time to prepare the pot, since this tree is going back in the same one. Cut your screen to give plenty of margin on each side, and wire it into the pot. This technique is very easy and gives good security to the screens if a few simple steps are taken. To make the wire mesh ties (Figures 8, 9); simply fold a piece of wire so that you have a very flat “z” or “n”. No need for fancy loops. Make it large enough so that it extends about ½ inch on each side of the hole in question.

When you bend down the tails to insert into the holes, bend them so that they just go snugly into the widest part of the hole. This will prevent your mesh from moving side to side. Wrap the tails snugly against the underside of your pot. Another tip for securing your mesh in the pot is to make the wire tie cross the hole at a right angle to the direction the tree tie-in applies force. This can be seen in the final photograph (Figure 10).
Pre-bend your wire ties so they lie flat against the bottom of the outside of the pot. Just measure them against the holes in the pot, bend, and insert from the bottom of the pot into the pot. Forget to do this, and you will find it awkward to add them after you have a layer of soil in the bottom of the pot! For this tie-down method to work, the portion of the tie wire that will pass over the wide side of the nebari must be longer, and the section that crosses the short side can be a bit shorter. It is also helpful here, to bend the ends of the wire down over the rim of the pot to hold them out of the way.
Notice that this pot has drainage/tie-down holes in the four corners. This is the best configuration for drainage and for securing the tree in the pot. If your pot has only two holes, one at each end, pass your tie wires through these holes to tie your tree in. This arrangement can allow a tree with a less developed nebari move, so be careful. Pieces of bamboo chopsticks can be passed across the nebari and the wire made to bear on it, giving solid support to weaker or more delicate areas. For trees with very dense root pads, a chopstick can be driven into the pad to give a purchase point for the wire.

But what if your bonsai is a collected tree with all its attendant challenges? If you have a wildly difficult root system, you can use what Boon Manakitivipart calls the “square-root” method of potting. Pieces of dimensional lumber (2X4, 2X6, 1X2, etc.) can be cut to proper size to wedge into the pot, allowing a bare portion of the base of the trunk to be supported. Non-reactive screws can be driven into the base of dead wood, providing another anchor point. Anything that secures the tree but does not harm the tree or show above the soil can be used.
Arrange the Roots

While you are working on your roots, be careful not to cut the remaining wires with your shears! They can look dark just like roots, and it is not a happy circumstance for the shears. (Figure 11) The photograph shows a drainage screen with a butterfly-shaped tie. The clip-shaped ties are much easier to make.

At this point, your root rake is going to come into very good use. Tip the tree onto the remaining solid side of the root ball (Figure 12). With a helper holding up the trunk so that the root ball is vertical, stand at the end of the root ball and drag your root rake across the base of the roots. Hold your rake so that the tines are at right angles to the roots. This will minimize damage to the roots from the tines getting caught behind them.

Use a light stroke; you only want to loosen up the first half inch or so. Once you have done this evenly across the entire root ball, use your root shears to cut them off as tightly to the flat surface as you can (Figure 13). Make your surface as flat as possible! Then repeat the process until you have trimmed the roots as thinly as you need to. This process can take a while, so work quickly but carefully.

As your root pad develops over the years, you will find that less and less drastic root work will be necessary. Figure 14 shows a well established Japanese maple being worked.

As you encounter large roots, when you have determined that they are no longer necessary, remove them flush with the soil using a pair of root cutters (Figure 15). Don’t worry about getting the entire root out at once; expose it a bit at a time so that you are working all the way across the root ball at the same depth.

How much should you take off of the roots? It all depends on the tree and the condition of the roots as you go along. Some species or even individual trees will require more than others. Figure 16 is an example of a large trident maple properly prepared for repotting. Only one thing remains to be pruned: the large nut holding the tree! Notice the grey areas. This is putty-type cut paste used to cover the stubs of large roots that have been reduced in this repotting.

When you have your roots arranged well at the bottom, it is time to work the top and sides of the roots. Until this time, these portions have been untouched to keep the root ball firm and make working on it much easier. The tree in Figure 17 is resting on a turntable, making it difficult to see just how thin the root ball is. It has been reduced to little more than one inch in depth. In future repottings, it may be reduced even more.
This tree is well-balanced, but it may well be that your tree will need some sort of support. Many bonsai have a center of gravity outside the base of their roots and cannot sit upright without being held in some way.
Many people use root hooks or chopsticks on this portion of the tree, but both of those items can cause a lot of damage to roots. Much easier to control and give a very light touch are the angled tweezers that came with your initial bonsai tool kit (Figure 18).

Drag these lightly toward you, directly away from the trunk. You will find it much easier to arrange the roots as you like. Don’t be in a hurry to do this. If you are out of the wind and sun, you shouldn’t have to worry too much about the roots drying out. If they seem to be doing so, drape a wet towel over the half of the root ball you are not working on, and move it when needed. You certainly don’t want to get the root ball too wet, as this makes a muddy mess and causes more problems than it might solve!

Other root work should also be done at this time. This tree has a good deal of dead wood on it, even at the roots. Some of that is reduced with a drawknife (Figure 19) to give the nebari a better, more tapered line, and to get rid of some of the soft, rotted wood. This is an older fukien tea with large, established areas of dead wood. The wood of tropical trees tends to be softer than that of conifers or even deciduous trees, so extra care must be taken to preserve it both for aesthetic reasons and to maintain the structural integrity of the tree. This tree will eventually need wood hardener or a marine epoxy resin to achieve this.

Following this, it is time for a little more delicate work underneath the root ball with my tweezers, looking for pockets of bad soil, etc(Figure 20). You should be able to see clearly the bottom of the trunk at this point. The base of the tree should rest solidly on new bonsai soil. Leaving any remnants of bad soil in a root ball is a common mistake of beginners ad experienced enthusiasts alike. It will eventually cause your tree to fail, so do not miss any!
Set the Tree in Its New Pot
The next obvious step in the process is to secure the tree in its new home. The next few steps are crucial to making the tree stable and secure, and to ensure that it will thrive.
Drainage Layer/Soil Mound
 (Figure 21) Traditional Japanese bonsai teaching indicates the need for a drainage layer at the bottom of your pot. The deeper the pot, the thicker should be the drainage layer. Try to use a slightly larger particle for this than your regular soil, and in a shallower pot, it may only be one or two particles deep. This will help prevent soggy soil and root problems including fungus and rot.
 “Perched” Water Tables
There has been some controversy as to the efficacy of drainage layers. A great deal has been made of the notion of “perched” water tables. A perched water table is
an aquifer that occurs above the main water table. This occurs when there is an impermeable layer of rock (aquiclude) above the main aquifer but below the surface. Water percolating down to the main aquifer gets trapped above this second impermeable rock layer. [1]
It must be noted here that perched water tables require a constant supply of ground water and an impermeable layer of rock or clay, neither of which are possible in a bonsai pot.
An engineered sort of perched water table has been employed by Turf Diagnostics and Design. This seems to be the closest thing to what is claimed for bonsai pots:
Perched Water Table
The USGA system provides maximum removal of water during heavy precipitation events, and it stores water above the gravel during periods when the ground is not saturated. How does it achieve this effect? Because the USGA system is based upon a concept known as the perched water table, which is also known as an inverted filter design. It is called an inverted filter because of the presence of the fine sand particles over the more coarse gravel. This design allows water to be held (or perched) in the root zone layer. This perched effect occurs because the primary driving force for water movement during periods of unsaturation is the capillary effect of the particle voids.
The large voids of the gravel result in a reduction in the capillary effect. At the root zone/gravel interface, these larger voids effectively create a barrier to further downward water movement during unsaturated times. As saturation is approached, additional pressure is applied allowing water to move into the larger voids of the gravel layer, and further down through the sub-surface drainage system.[2]
There are a couple of interesting thing about the USGA system. One is that it is engineered to ensure that water does perch, as this is beneficial to the plants (sod) above. Another interesting note is that the sod is planted in fine sand, and the gravel below is quite large. And while it is not stated in the above reference, my guess is that some sort of filter fabric is used to keep the two layers distinct.
In the bonsai pot, none of these elements pertain. The two layers of soil are in contact, and the difference in size must not be so extreme. Because there seems to be no proof for a deleterious effect, I choose to follow the Japanese tradition for its self-evident history of success.
Mound the Soil
 The movement of this tree is to the left, so it must be planted toward the right in its pot. A largish mound of soil is placed directly under where the trunk base will sit (Figure 22). The tree will be placed here and wriggled firmly into place, removing air pockets or voids underneath it. This mound should not be so large that the tree will sit too high in the pot, nor so small that it will allow the tree to sit too low.
 Position the Tree

Correct placement of the tree in its pot is a crucial stage of the repotting process (Figure 23). Unless we are restyling an established tree, it should be replaced with the same orientation it had previously. With a solid nebari and established position such as this tree, it is a fairly simple matter. Position yourself at eye level with the rim of the pot to check the rise of the nebari from the pot. Keep an eye on previously styled branches to be sure they are in their proper place. Settle the tree and prepare to tie it in.
Bunjin or other trees with unusual planting positions can pose a challenge when trying to repot in an identical orientation. How does one make certain a return to the original position? A small carpenter’s plumb bob is indispensable. Before removing the tree from its pot, tie it to a prominent branch, allowing the tip to almost touch the nebari. Place a single dot from a Sharpie at that point will help line up the tree correctly in its new pot. Simply be sure that the plumb bob touches the dot in just the same way when repotting the tree.
Wire the Tree into the Pot
Many trees, especially prebonsai, have prominent roots, roots that are too high, or a developing nebari that makes it difficult to get a grip with the wire without damage to the bark. Protect your tree in this case with a portion of old garden hose cut for the purpose, or some other firm but flexible product to avoid wire scars. Place it carefully between the wire and the bark. Be sure it is not going to let the wire slip off when you tighten the tie wires. One excellent product for this is the used serpentine belt from a late-model car. These have deep grooves running lengthwise which allow the wire to settle in, avoiding mishaps.

Plan your work here so that your final tie, the one which you will tighten in the final step, bears on the portion that would tend to tip up if there were no wires present. This will give you your best holding power. Begin with the wire just to the right or left of that spot (Figure 24), depending on which direction you will be proceeding, and bend the wire across the nebari, far enough out that it doesn’t rub the bark or show above the soil. If necessary, a stub of chopstick can be driven into a firm root ball farther away from the trunk to keep the wire to the outside.

Twist this wire together with the one at the next corner, and bend the tail of the next wire across the narrow part of the root ball (Figure 25). There is no need for the wires to be tightened too much, since we will finish tightening them all together with the final wire. We are, in effect, creating a wire basket to distribute force evenly around the nebari. The final tightening will cinch the entire basket at once. Repeat with the next wire.

When you get back to the place you started, you will realize that you have no wire to twist with your final tail. Use a piece of wire of proper length and loop it around the first wire you tied down, twisting it to provide you with the tail you need. You will then twist the two tails together, and this will be the spot you will tighten until the wires hold the nebari snugly (Figure 26).
Add Soil
The tree is now tightly wired to the pot. This technique produces an evenly distributed band of support far enough from the nebari that the bark is not compromised and the tree is completely immobile. Since every tree is different, it is difficult to document every available technique for bridging gaps in the nebari, or working with a difficult root system. However, this is the basic technique that will provide your tree with the security it needs to thrive with normal care.
The time has come to incorporate new soil into the pot. Using a chopstick, carefully work the soil between and under the roots, removing all air pockets as you go around the entire tree. Plunging the chopstick into the soil vigorously and repeatedly is a recipe for pulling feeder roots above the soil.. A gentle circular twirling motion is gentler for the tender roots. Don’t be too vigorous when performing this technique. Try not to mix your regular soil and the drainage layer at this time. When no more soil will easily settle into the roots, remove any excess. Have your helper hold the trunk securely and thump the sides of the pot with the heel of your hand to settle any more soil that might be useful.

This is where that whisk broom from your bonsai kit will be very useful. It is designed for one purpose: to finish fresh soil added to your pot (Figure 27). Holding it gently, drag it lightly away from the nebari toward the edges of the pot. Proceed all the way around your pot. Excess soil can be collected in your hand at this time and saved for later.

Bonsai soil should not be mounded up at the tree, it should be flat and level across the pot. If you must mound your soil, your tree is in too shallow a pot. Mounded soil washes away with every watering, so be good to your tree and pot it correctly. The level of the soil should be just below the rim of the pot (Figure 28). This will ensure that water will remain in the pot to soak the root zone, and not run over the rim as your soil compacts over time.

The final step with your new soil is to tamp it with a small trowel. The imported trowels have a pointed tip for getting into corners. This is a cement mason’s margin trowel (Figure 29) left over from a previous career. They are available at any building supply store. The blade tends to be large for some bonsai, but they are easily shaped on a bench grinder. For extremely large bonsai with very low branches, one with a much longer steel handle out to a wooden grip is very handy.

New Zealand sphagnum moss is a white sphagnum with a very consistent texture. It has none of the negative properties of green sphagnum moss. It is a very simple process to scrub it on your largest soil screen, reducing it to small fibers. A very light sprinkling of sphagnum on top of your soil prior to watering (Figure 30) will help settle the soil and keep it in place, as well as retaining moisture a little better. Water so that all the excess fibers are washed off the pot. Be careful not to use too much!
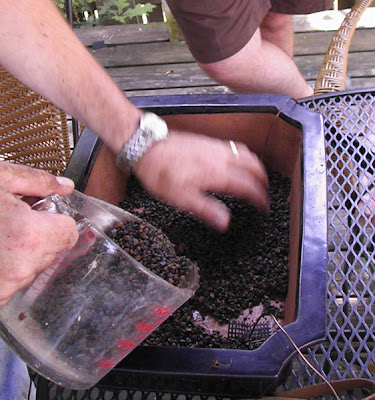
Water Well
Watering is the last stage in repotting. Using the gentlest shower available, water until the runoff from under the pot is clear. Even freshly sifted bonsai soil retains a good deal of dust, and when you first start watering, this will be washed away. Do not immerse a freshly repotted tree to water it! Immersing the newly repotted tree will just lock the dust into the soil. Your tree is now repotted and ready to go to a protected spot on your bench.
Aftercare
The period after repotting is a tender one for your tree. Keep it protected from excess sunlight and heat (although for tropicals, heat is a key to recovery), and especially from drying winds. There is no need to “balance the top with what you have removed from the roots.” This old wives’ tale will weaken and even kill your tree. The roots you have removed need to be regenerated, and it takes the foliage to do that. Just keep your tree from drying out. After 2-4 weeks, you may begin feeding your tree again, and put it in a less protected spot. You will see new growth as soon as new roots become established.
Conclusion
These are some of the techniques and tools used in the process of repotting a bonsai tree. It is important to learn the principles involved, since every tree is different. Once the principles are established, creativity is the key to supporting and protecting your valuable trees. Good luck and happy repotting!

 The care and sharpening of good bonsai tools is of paramount importance. Dull blades tear plant tissues, making healing difficult. Dirty, rusty blades carry pathogens from tree to tree, spreading what may have been contained otherwise. Tools in poor condition subject you to ridicule and derision and the embarrassment of that look your sensei gives you.
 In order for your tools to be sharpened effectively, your sharpening stones must be perfectly flat. The only way to do this is with the lap stone, which is far harder than your hardest stone and yet coarse enough to remove the high spots. This stone is soaked, too, and the smaller sharpening stones are passed over it vigorously. Be sure to check your surface often to make sure you do not take off too much material. Once your stones are true, you are ready to begin shaping the surface.
 If you have a chipped or broken blade tip, you can reshape it using the side of your coarse stone. With the edge up, move the tool back and forth in a straight line, shaping the tip to a good point. This will groove the stone, which is why we use the edge instead of the surface. Once your point is properly shaped, it is time to proceed to sharpening the tool.
  Look closely at the blades of a grafting knife (or your better bonsai shears). If you have a new one, this will be the most instructive. You will find that these blades are not shaped like your household scissors or any other pair of pruning shears. Where most knife edges are formed where two angled planes meet, a grafting knife edge is formed where a flat (actually slightly concave) face meets a long, flat, beveled edge. Examine the photograph carefully. You will see a fine line about a quarter inch from the edge of the blade. This is not a beveled edge, it indicates where the layer of better steel is laminated to the body of the blade. The entire polished face of the blade is a single plane, honed to an edge a few molecules across.
  Where other scissors or shears are designed with a definite bevel at the cutting edge (to make sharpening easier and to enable the edge to last longer), bonsai shears are designed so that the back face and front face meet at a very acute angle. Thus a single edge is formed, making possible the sharpest cutting edge possible. The most important point when sharpening a blade like this is to hone the entire front face of the blade, removing material evenly across the face, providing an edge that is ultimately sharper than a razor. But how does this information translate into actually forming that edge?
 The key to forming a good edge on your flat-bladed tools is in your honing tools and the proper angle of attack, as it were. As you can see at the right, a shadow is formed if the edge of the blade is held too high. This angle will merely round off the back of the blade, and nothing will be accomplished. On the other hand, if the back of the blade is raised, the edge will form a bevel, which will never be sharp enough to slice the living tissue of the tree without damaging it. For the best results, the face of the blade must be kept in full contact with the sharpening stone throughout the sharpening process. The photo above shows the proper angle for a pair of bonsai shears, while below is incorrect.
 As sharpening progresses, a slurry will form, made of material from the sharpening stone and the blade. It is important that this slurry remain on the stone to facilitate sharpening of the blade. As the moisture in the stone drops, it is crucial that it be kept wet. You can add fresh water, but it is easier to keep the slurry if you reuse the water that has drained from the stone, as it has some slurry already within it. Always keep your stone wet and your slurry in place.


